> ## Documentation Index
> Fetch the complete documentation index at: https://docs.hoppscotch.io/llms.txt
> Use this file to discover all available pages before exploring further.
# AI Assistant
> Set up the experimental AI Assistant in self-hosted Hoppscotch Enterprise to edit, run, test, and organize requests by chatting with an AI model.
Experimental
The **AI Assistant** is a chat panel inside Hoppscotch. It reads the request, response, environment, and collections you're working with, and uses Hoppscotch's own actions to make changes, such as adding auth, writing tests, running a request, or organizing a collection. Admins choose which AI provider and models it uses.
The AI Assistant is available on Enterprise Self-Host and needs an active license. Enterprise Cloud support is coming soon.
## Set up the assistant
These steps are for admins, in the **Admin Dashboard**.
### Turn on the assistant
1. Go to **Settings** and open the **AI** tab.
2. Turn on **Enable the AI assistant**.
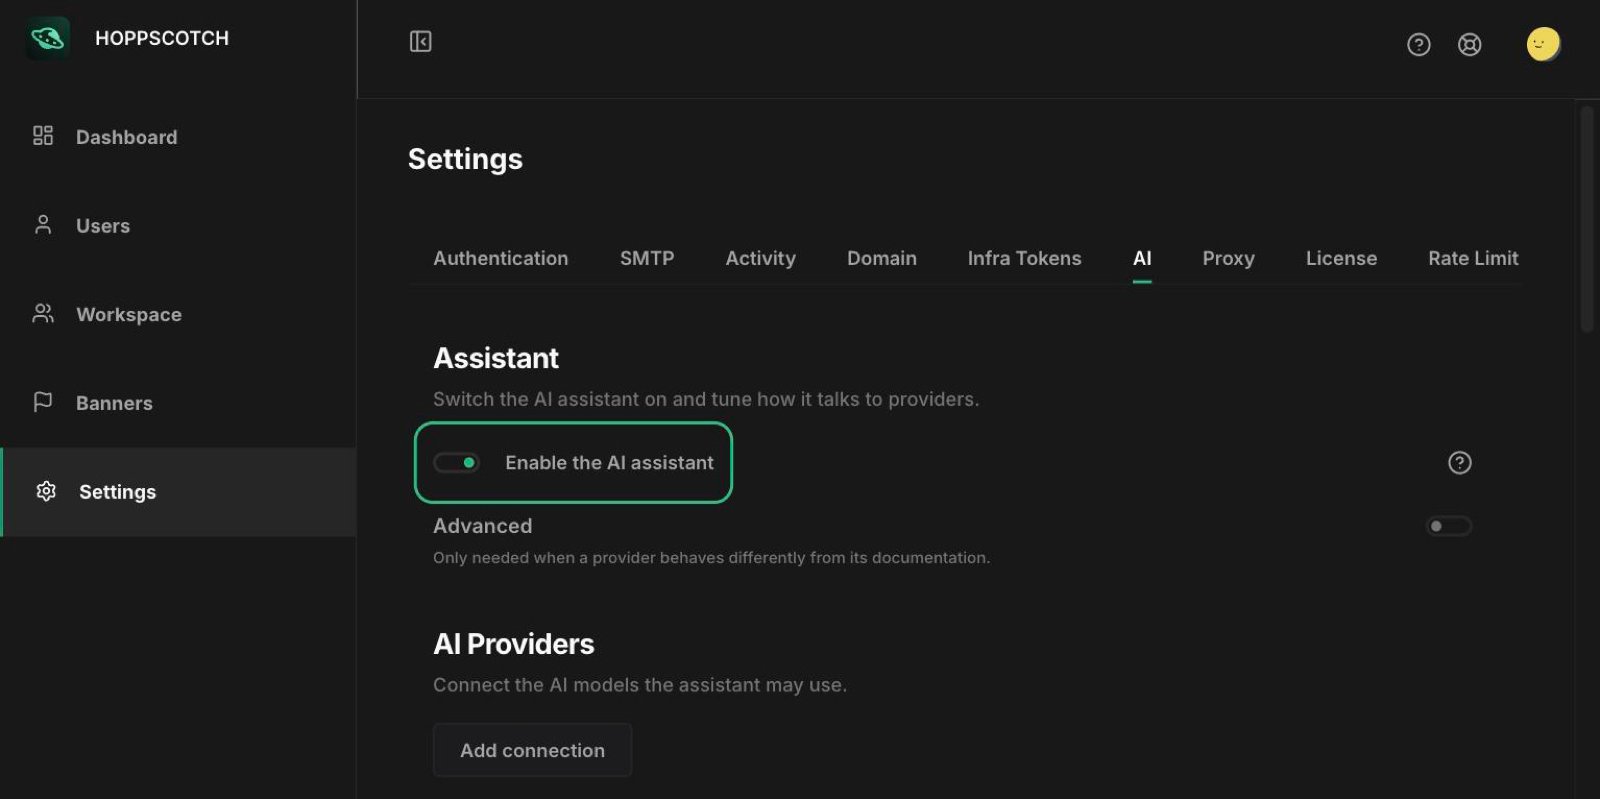 Signed-in users now see the **AI Assistant** button in the app. Connect a provider next, so the assistant can answer.
### Connect an AI provider
1. Under **AI Providers**, click **Add connection**.
2. Enter a **Label** to identify the connection.
3. Pick a **Provider**: Anthropic, DeepSeek, Bedrock, OpenAI, Azure, Gemini, OpenAI-compatible, or Custom.
4. Set the **Endpoint**. It's optional for Anthropic, DeepSeek, OpenAI, and Gemini, which use the provider's API by default. It's required for Bedrock, Azure, OpenAI-compatible, and Custom, for example a local runtime such as Ollama (`http://localhost:11434/v1`).
5. Enter the **API key**. It's stored encrypted and never shown again. When you edit a connection later, leave the field blank to keep the stored key.
6. Under **Models**, pick from the suggestions or type model IDs, separated by commas, then choose a **Default model**.
7. Click **Test connection** to check that every model responds, then click **Save**.
Signed-in users now see the **AI Assistant** button in the app. Connect a provider next, so the assistant can answer.
### Connect an AI provider
1. Under **AI Providers**, click **Add connection**.
2. Enter a **Label** to identify the connection.
3. Pick a **Provider**: Anthropic, DeepSeek, Bedrock, OpenAI, Azure, Gemini, OpenAI-compatible, or Custom.
4. Set the **Endpoint**. It's optional for Anthropic, DeepSeek, OpenAI, and Gemini, which use the provider's API by default. It's required for Bedrock, Azure, OpenAI-compatible, and Custom, for example a local runtime such as Ollama (`http://localhost:11434/v1`).
5. Enter the **API key**. It's stored encrypted and never shown again. When you edit a connection later, leave the field blank to keep the stored key.
6. Under **Models**, pick from the suggestions or type model IDs, separated by commas, then choose a **Default model**.
7. Click **Test connection** to check that every model responds, then click **Save**.
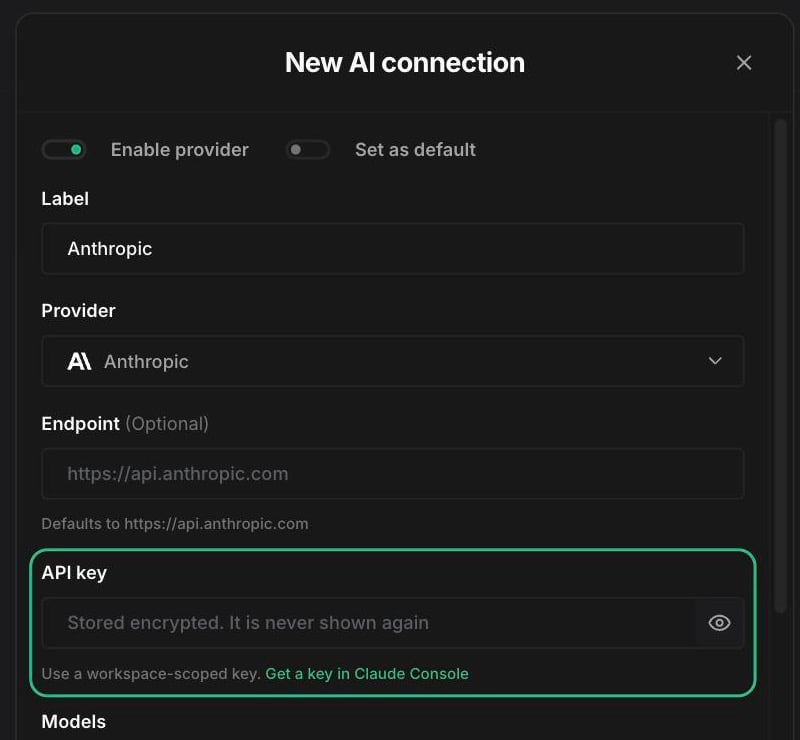 For Anthropic, create the key in [Claude Console](https://platform.claude.com/settings/keys) and scope it to a workspace. A key that isn't scoped to a workspace fails the connection test.
You can add several connections. Users choose between their models in the chat, and the connection marked **Set as default** is used when they don't pick one. Turn off **Enable provider** to hide a connection's models without deleting it.
### Advanced settings
Open **Advanced** only when a provider behaves differently from its documentation. These settings apply to every connection.
| Setting | What it does |
| - | - |
| **Request timeout (ms)** | How long a chat step can take, from 1,000 to 600,000 ms. |
| **Max retries** | How many times a failed provider call is retried, from 0 to 10. |
| **Reasoning effort** | How much the model reasons before answering. **Follow the provider** keeps each model's default. |
| **Server-side tool search** | Whether the provider searches tools on its side: **Follow the provider**, **Force on**, or **Force off**. |
| **Prompt caching** | Whether provider-side prompt caching is used, with the same three options. |
### Add skills
Skills are named prompts that users pick from the **/** menu in the chat. The assistant comes with these built-in skills:
| Skill | What it does |
| - | - |
| `/debug-request` | Works out why the current request is failing. |
| `/write-tests` | Adds tests covering the current response. |
| `/explain` | Describes what the request does and what came back. |
| `/add-auth` | Sets up auth on the request. |
| `/document` | Writes a description for the request or collection. |
| `/run-and-check` | Sends the request and says whether the response looks right. |
To add your own, click **Add skill** under **Skills**, then enter a **Slug** (users type `/slug`), a **Name**, a one-line **Description**, and the **Prompt** to send. A custom skill with the same slug as a built-in replaces it.
## Use the assistant
1. Click **AI Assistant** in the bottom-right corner of the app.
2. Check the **Context** chips at the top. They show what the assistant can read, such as your request, response, environment, and collections. Click a chip to leave it out.
3. Type what you want, pick a suggestion, or type **/** to choose a skill.
4. Pick a different model from the menu below the message box if your admin connected more than one.
For Anthropic, create the key in [Claude Console](https://platform.claude.com/settings/keys) and scope it to a workspace. A key that isn't scoped to a workspace fails the connection test.
You can add several connections. Users choose between their models in the chat, and the connection marked **Set as default** is used when they don't pick one. Turn off **Enable provider** to hide a connection's models without deleting it.
### Advanced settings
Open **Advanced** only when a provider behaves differently from its documentation. These settings apply to every connection.
| Setting | What it does |
| - | - |
| **Request timeout (ms)** | How long a chat step can take, from 1,000 to 600,000 ms. |
| **Max retries** | How many times a failed provider call is retried, from 0 to 10. |
| **Reasoning effort** | How much the model reasons before answering. **Follow the provider** keeps each model's default. |
| **Server-side tool search** | Whether the provider searches tools on its side: **Follow the provider**, **Force on**, or **Force off**. |
| **Prompt caching** | Whether provider-side prompt caching is used, with the same three options. |
### Add skills
Skills are named prompts that users pick from the **/** menu in the chat. The assistant comes with these built-in skills:
| Skill | What it does |
| - | - |
| `/debug-request` | Works out why the current request is failing. |
| `/write-tests` | Adds tests covering the current response. |
| `/explain` | Describes what the request does and what came back. |
| `/add-auth` | Sets up auth on the request. |
| `/document` | Writes a description for the request or collection. |
| `/run-and-check` | Sends the request and says whether the response looks right. |
To add your own, click **Add skill** under **Skills**, then enter a **Slug** (users type `/slug`), a **Name**, a one-line **Description**, and the **Prompt** to send. A custom skill with the same slug as a built-in replaces it.
## Use the assistant
1. Click **AI Assistant** in the bottom-right corner of the app.
2. Check the **Context** chips at the top. They show what the assistant can read, such as your request, response, environment, and collections. Click a chip to leave it out.
3. Type what you want, pick a suggestion, or type **/** to choose a skill.
4. Pick a different model from the menu below the message box if your admin connected more than one.
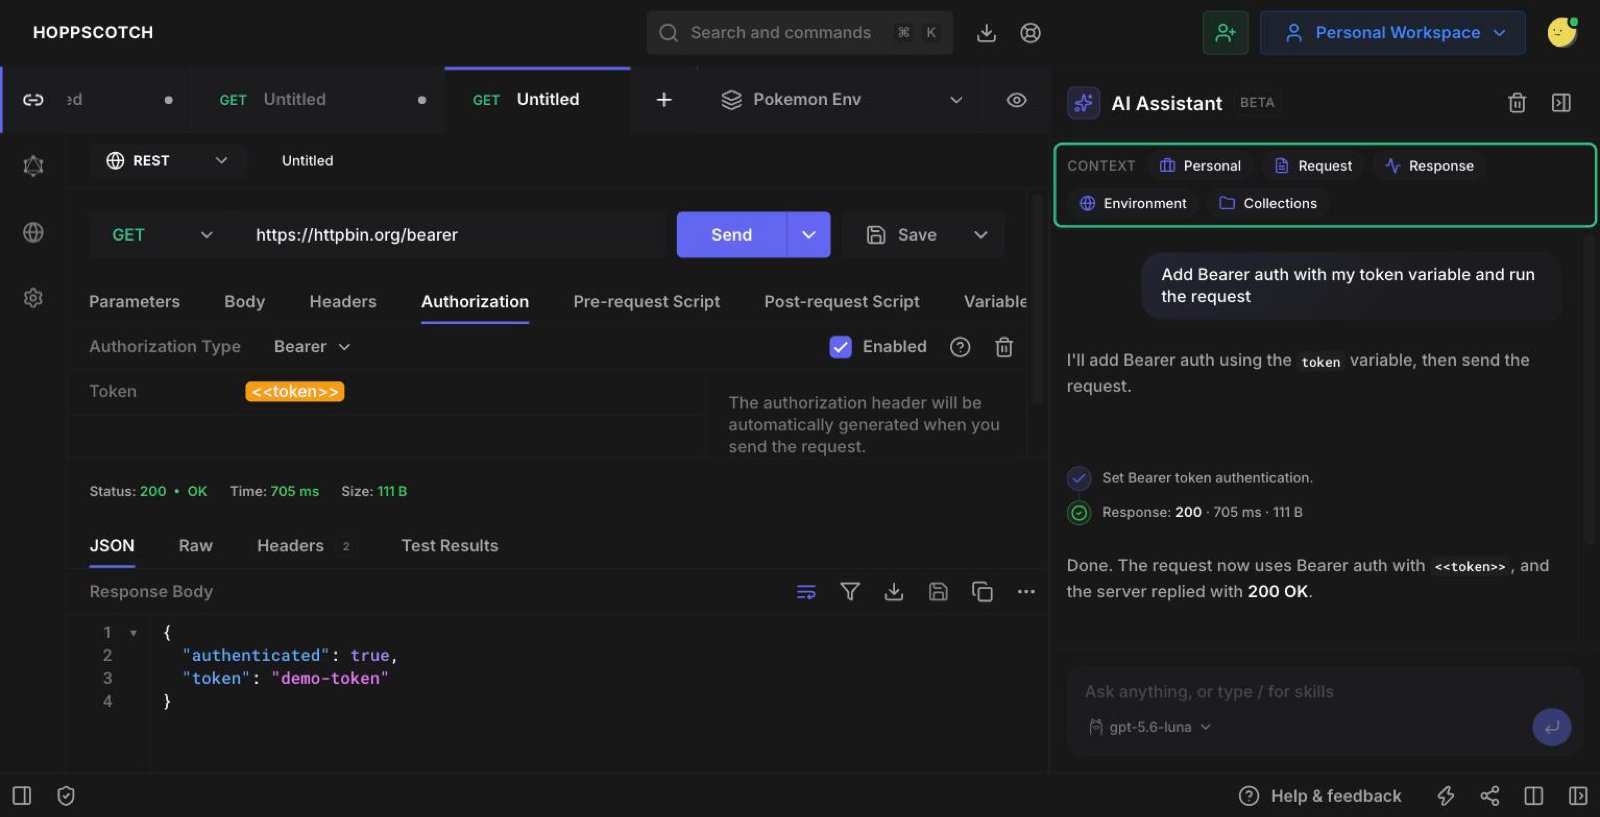 The assistant shows each action as a step, so you can follow what it changed. It can:
* Edit a request's method, URL, headers, parameters, body, auth, scripts, and description.
* Run and save requests, and write tests for the response.
* Open, close, and switch tabs, and switch between REST and GraphQL.
* Create and select environments, and add or update variables.
* Switch workspaces, and create or rename team workspaces.
* Create collections and folders, add requests to them, rename or delete them, and run a collection.
* Publish API documentation and manage mock servers.
Users who don't want the assistant can hide it in **Settings** > **Experiments** by turning off **AI Experiments**.
## Confirmations
The assistant asks before it does something that sends data somewhere new or can't be undone:
* Running or saving a request that points at a host the assistant chose and you never typed, including hosts that a script it wrote sends to.
* Deleting a collection or a mock server.
* Publishing or unpublishing documentation.
* Making a mock server public.
The assistant shows each action as a step, so you can follow what it changed. It can:
* Edit a request's method, URL, headers, parameters, body, auth, scripts, and description.
* Run and save requests, and write tests for the response.
* Open, close, and switch tabs, and switch between REST and GraphQL.
* Create and select environments, and add or update variables.
* Switch workspaces, and create or rename team workspaces.
* Create collections and folders, add requests to them, rename or delete them, and run a collection.
* Publish API documentation and manage mock servers.
Users who don't want the assistant can hide it in **Settings** > **Experiments** by turning off **AI Experiments**.
## Confirmations
The assistant asks before it does something that sends data somewhere new or can't be undone:
* Running or saving a request that points at a host the assistant chose and you never typed, including hosts that a script it wrote sends to.
* Deleting a collection or a mock server.
* Publishing or unpublishing documentation.
* Making a mock server public.
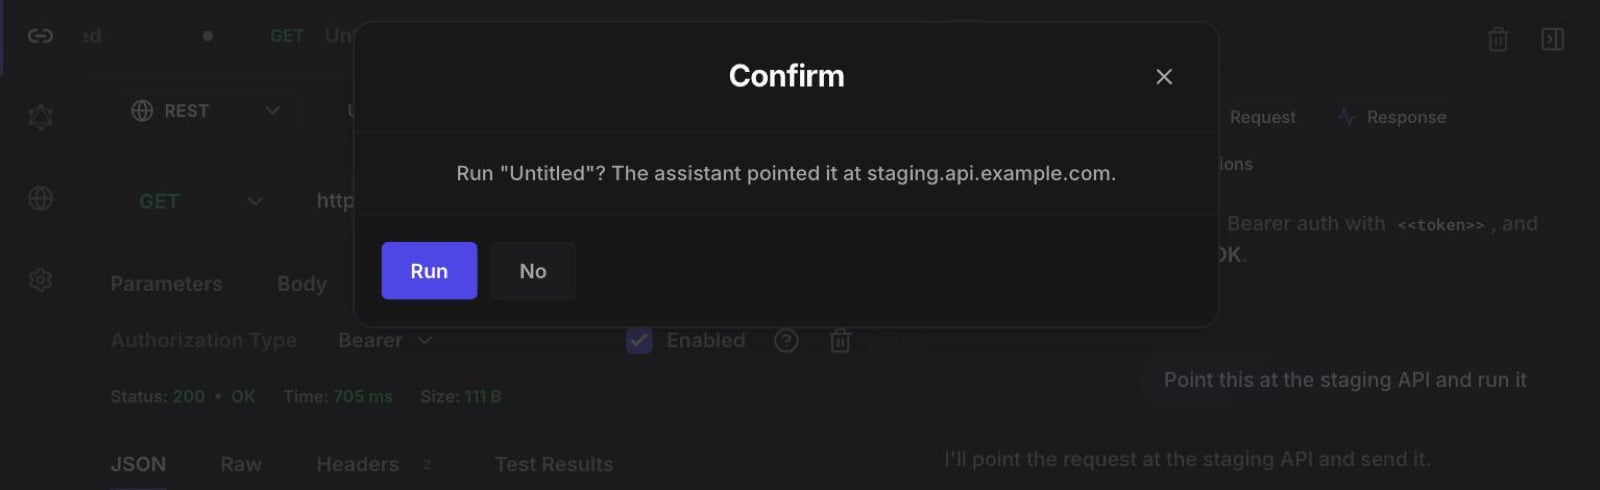 Other edits, such as changing headers or rewriting a script, are applied directly and shown as steps in the chat.
## Privacy and security
* API keys are stored encrypted and are never sent back to the browser.
* The assistant sees the names of your environment variables, not their values.
* Values that look like credentials, such as tokens, API keys, and passwords, are replaced with placeholders before anything is sent to the AI provider.
* The rest of the context, such as the request, the response, and collection names, is sent to the provider your admin connected.
## Troubleshooting
| Message | What to do |
| - | - |
| No AI model is configured | An admin needs to connect a provider under **Settings** > **AI**. |
| The assistant is off on this server. Ask your admin. | An admin needs to turn on the assistant, and the license must be active. |
| The AI provider rejected this server's setup. Ask your admin. | Check the connection's API key and endpoint, then click **Test connection**. |
| That model is gone. Pick another and resend. | Pick another model from the menu below the message box. |
| Too many requests. Wait a moment and retry. | The provider is rate limiting. Wait and send again. |
| The AI service took too long. Try again. | Try again. An admin can raise **Request timeout (ms)** under **Advanced**. |
| This chat is too long. Clear it and retry. | Click **Clear chat** and start a new conversation. |
Other edits, such as changing headers or rewriting a script, are applied directly and shown as steps in the chat.
## Privacy and security
* API keys are stored encrypted and are never sent back to the browser.
* The assistant sees the names of your environment variables, not their values.
* Values that look like credentials, such as tokens, API keys, and passwords, are replaced with placeholders before anything is sent to the AI provider.
* The rest of the context, such as the request, the response, and collection names, is sent to the provider your admin connected.
## Troubleshooting
| Message | What to do |
| - | - |
| No AI model is configured | An admin needs to connect a provider under **Settings** > **AI**. |
| The assistant is off on this server. Ask your admin. | An admin needs to turn on the assistant, and the license must be active. |
| The AI provider rejected this server's setup. Ask your admin. | Check the connection's API key and endpoint, then click **Test connection**. |
| That model is gone. Pick another and resend. | Pick another model from the menu below the message box. |
| Too many requests. Wait a moment and retry. | The provider is rate limiting. Wait and send again. |
| The AI service took too long. Try again. | Try again. An admin can raise **Request timeout (ms)** under **Advanced**. |
| This chat is too long. Clear it and retry. | Click **Clear chat** and start a new conversation. |